I. Browsing
1.1 Comparison
1.2 Status
1.3 Database XML file
II. Running
2.1 DOSBox
2.2 PCem
2.3 86box
2.4 PCE
2.5 VirtualBox
III. Imaging
3.1 dd
3.2 dd_rescue
3.3 RawWrite
3.4 UltraISO
3.5 WinImage
3.6 Teledisk
3.7 Diskcopy
IV. Contributing
4.1 What to upload
4.2 Image types
4.3 Uploading
4.4 Feedback
Introductory note
We started preserving floppy images as a side project, but this has evolved into one of the biggest collections of floppy disk images on the net, which owes its existence to several contributors. We are open to everyone else who wants to save their own disks from bit rot. Incidentally, we collect not only games but various applications as well, although they were not on our initial agenda.
I. Browsing
1.1 Comparison
If you want to test the authenticity of your and/or our dumps you may want to compare your dump sets against ours should you have any matching titles. Here's where SHA-1 hashing method comes in handy. To break it down, it's about generating short 40-char alphanumeric strings (one per each file) which cryptographically reflect the entire file contents down to a single byte. If at least one byte is different on either side the resulting hash value will differ dramatically.
Attention!
- This may not apply to hybrid or stream images as their internal properties are variable in nature to the point where new media or another dump instance of the same exact media will always produce different hash results!
- IMZ files should be unzipped prior to hashing as obviously being compressed their resulting values cannot be valid
These strings can be found in every set information unit labeled as SHA1 Hashes and should look something like this:
b7455de0d2368413f926a3f16aeb74355182398e  disk1.img
7808307f7ef3c6cb9c2d4465d48194b43aaa64ce  disk2.img
340411b47fd34a2c7112d76d1157d03e457fd866  disk3.img
Of course, to hash your own files you will be needing a corresponding tool. Below are the two best options.
a. sha1sum (Linux/Windows)
This is a standard command-line utility included with every Linux distribution (Windows version is here). Despite the lack of graphic interface, this is a simple and quick tool to hash your files. The syntax to process a single file inside a directory is as follows:
sha1sum disk.img
To generate hash strings of multiple files:
sha1sum *
You can also output the resulting values into a text file for later use:
sha1sum * > files.sha1
b. HashMyFiles (Windows)
Official website: https://www.nirsoft.net/utils/hash_my_files.html
This is a light, portable and incredibly flexible Windows application which can be integrated in your context menu and easily evoked whenever necessary. Simply right-click on the folder contanining target files and hit HashMyFiles from the menu.
Attention! Be sure to use SHA-1 hash exactly, because this tool supports more than one hashing method.
While the above step is optional and completely unnecessary (we can easily run hash check on our side), we provide these instructions just in case as you may benefit from them yourself.
1.2 Status
Besides general information and SHA-1 hash each set info block also includes status field whose parameter is often self-speaking being sometimes complemented with notes. For clarity sake we shall describe all possible implications:
"Unverified"
Files pending verification. This may take a while as oftentimes it's pretty hard to tell whether the dumps are authentic or healthy enough. A lot of them come from different sources and their uploaders can't always account for their condition, in which case we can only wait until someone else confirms their validity by sharing reliable information or uploading their own dumps which may fully or partially match them. If you have any information regarding certain unverified sets in our collection - please, do kindly report in this thread.
"Verified"
Confirmed as unmodified and consistent with the original source. Incidentally, if you are unsure whether some of your disks are legit or fully intact you may want to compare their hash values against some of the verified sets in our archive. Of course, occasional mistakes are possible, but we are doing our best.
"Modified"
A variety of issues ranging from small and almost insignificant changes in boot, root and data area to rather intrusive. The most typical are:
- Modified OEM ID (occurs under Win95+ if disks are not write-protected)
- Modified Root Directory (Creation and Last Access Timestamps, same nature as above)
- Created or modified native files (HISCORE, .CFG, .INI files, new directories, etc.)
- Extraneous files (typically traces of antivirus or disk checking software)
Such dumps may as well include missing copy protection and/or cracked loaders, but if there is more than one issue then they are treated simply as "Modified". Occasionally, these can be restored or superseded by superior sets.
"Cracked"
Technically modified, these should only have their loaders (.EXE or .COM files) replaced or edited to override copy protection, therefore this case is singled out.
"Missing copy protection tracks"
The game will not run without copy protection scheme. Similarly to "Cracked", used only when no other issues are detected. This only applies to raw (.IMG) files.
"Bad"
Severely corrupt, dumped incorrectly or coming from disks other than original. Similarly to modified dumps, some of these may be superseded.
"Restored"
Formerly invalid or modified dumps replaced or fixed manually in attempt to reproduce the original disk inventory. Of course, depending on the severity of modification we cannot always vouch for 100% flawless restoration nor if the dumps come from the original floppies in the first place. Therefore, this is no different than "Unverified" which is still potentially modified, except we let you know that we did our best to bring these into better shape and maybe, just maybe they are as good as original.
1.3 Database XML file
If you plan on going through heaps of images for comparison and/or verification purposes we suggest you get the latest XML file listing of our entire archive contents (hashes and statuses included) to speed up and facilitate your work. You can open it in programs like ClrMamePro or ROMVault or simple notepad (will include XML metadata).
II. Running
To work with images you will be needing an emulator program. Below are the 5 best known applications, each with their own set of features, pros and cons. You should choose the one meeting your personal needs and expertise.
2.1 DOSBox (Linux/Windows)
Official website: https://www.dosbox.com/
This is without a doubt the most popular emulator yet, which needs little introduction. It's super fast, light and fairly adjustable, which in many cases should suit the needs of your average old-school gamer. While it may have certain drawbacks like absence of a graphic interface or support for hybrid/protected images, its remaining pros compensate for it tenfold.
To mount a floppy image in type in console:
imgmount a disk.img -t floppy
Note: "a" is obviously the letter assigned to your virtual drive, "disk.img" is the source image name and "-t floppy" is the type of an image.
To mount multiple images on the same virtual drive:
imgmount a disk1.img disk2.img disk3.img -t floppy
This way you can switch between mounted images whenever necessary by simply pressing Ctrl+F4 (check the status window for feedback). This is particularly useful when you're running an installation program and have to process several disks one by one which are otherwise impossible to replace unless you are using real floppy drives or virtual drives outside DOSBox.
Unfortunately, this feature is not available in the latest official release of DOSBox (0.74). It was last present in 0.70, but retracted later due to reported buggy behavior. However, instead of downgrading to version 0.70 we would recommend using SVN builds (forks) like DOSBox-X or DOSBox SVN-Daum, which include but are not limited to the above missing feature.
To load a booter or any other bootable image simply type:
boot disk.img
For more information see DOSBox wiki
2.2 PCE (Windows)
Official website: http://www.hampa.ch/pce/
A good alternative to DOSBox with a pretty good support for hybrid-type images namely .TD0 and .PSI (native format). Unlike DOSbox, however, it is limited to AT (286) emulation alone, which makes it particularly suitable for running physically protected games released until 1993.
To mount images in PCE you can either edit pce-ibmpc.cfg file ("Floppy Disk Controller" section) or use the command line PCEMSG.COM utility included by default on PCE hard drive image. The syntax for the latter option is as follows:
pcemsg disk.insert disk.psi
or:
pcemsg insert disk.psi
By default it will mount images in drive 0, which you don't really want to change. But if you really should you can do the following prior to mounting:
pcemsg disk.id 1
or:
pcemsg id 1
Note: To enable correct parsing of hybrid images uncomment "#drive0 = 0x00" (remove the hashtag on the left) in "The floppy disk controller" section of the pce-ibmpc.cfg file and make sure you always mount your images in drive 0.[/i][/b]
Attention! Always get the latest version of this application as the official downloads on the website are quite outdated.
2.3 PCem (Windows/Linux)
Official website: https://pcem-emulator.co.uk/
A worthy opponent to DOSBox. Its strongest point is the aim towards emulation of a specific type of hardware with native capabilities. It has a user-friendly interface and a proper settings manager which exempts you from fiddling with any configuration files or pure console. However, it requires BIOS ROMs to run, and since those are proprietary they are not included with the emulator by default.
Unlike DOSBox it doesn't work out-of-the-box (no pun intended), it has to be configured and set up like a real machine, i. e. you should create a hard drive, partition it, install an OS, necessary drivers, etc. The result, however, may be well rewarding. Incidentally, PCem is a lot better suited for running Win9x than DOSBox, so there goes another star.
2.4 86box (Windows)
Official website: http://ci.86box.net/
If for any reason you are not happy with PCem and find it inadequate, you can try 86box which is a fork of the latter. It has slightly different options and certain enhanced features. One of the definite pros is the support for extra file types, which includes .TD0 (Teledisk) and the author's own format - 86F.
In spite of earlier statement, we would not recommend 86box for Teledisk files as the support for this format is still limited. For one thing, it is read-only here, which may backfire on attempt to run games whose protection requires writing to disks. That said, it's best to leave TD0 to PCE and stick with just 86F.
If you still must work with .TD0 images then you may have to toggle "Turbo timings" in "Tools -> Settings -> Floppy drives" to get something to run correctly (never use it for 86F!). Keep in mind, while it may work for some disks it can be a problem for others. It may also depend on the quality of dumps and your drives' configuration in 86box & machine's BIOS settings.
2.5 VirtualBox (Windows/Linux)
Official website: https://www.virtualbox.org/
VirtualBox may not provide the best virtualized environment nor is it well-suited for gaming due to certain limitations, but it is good enough to test the workability of some products where other emulators may occasionaly fail or perform slower.
VirtualBox uses your actual machine's capabilities by default regardless of OS used, so if you want to, say, run a quick test installation in either DOS or Windows machine, this is probably the best of choices.
Just like PCem and 86box this must be set up like a real machine (partitioning, OS installation, drivers, etc.).
III. Imaging
For this you will be needing:
- Original floppy disk(s)
- Working 3.5" / 5.25" floppy disk drive(s) with respective cable(s)
- Suitable backup utility (software and/or hardware)
As such, there are two possible alternatives:
1. Benefit from a portable USB 3.5" floppy drive for modern machines, which should be available in your local IT store or online one. This is generally not recommended unless 3.5" floppies is all you have and they are not physically protected.
2. Purchase a KryoFlux or Supercard Pro device, which among other things support real 3.5" and 5.25" floppy drives.
Note: It is not our intent to provide the how-to guidelines for these as being a proud owner of either device you should be able to acquaint yourself with the documentation kindly provided by the manufacturer itself.
Finally, when all set you have to choose your preferred disk backup tool to make dumps of your floppy disks. Reviewed below are the few more or less featured applications for different systems and with different capabilities.
3.1 dd (Linux/Windows)
Official website: http://www.chrysocome.net/dd and Wiki.
dd is a free open-source disk backup utility, which originated as a standard Unix/Linux command-line tool but was eventually ported to Windows as a limited edition. This application is console-based (no GUI) and is operated completely via terminal/command prompt. The standard routine to create a backup image file from physical media is as follows:
Linux:
dd if=/dev/fd0 of=disk.img
Windows:
dd if=\.\a: of=c:\disk.img bs=1440k
Obviously, "if" parameter stands for input file, "of" for output and "bs" for block size which should amount to your actual floppy disk capacity. Filename, source and target locations should be likewise changed according to your situation and preference. You can write an image back to a floppy disk using a simple reversal in syntax:
Linux:
dd if=disk.img of=/dev/fd0
Windows:
dd if=c:\disk1.img of=\.\a: bs=1440k
Note: "bs=1440k" flag in both cases is optional. It only tells the application the size of your disk which skips autodetection and accelerates reading/writing process particularly on Windows systems. Other possible parameters are respectively "720k", "1200k", "360k", etc.
If your disks are damaged dd will quit execution as soon as it stumbles on read error. In a situation like that you can ignore unreadable sectors by supplementing the former command with conv=noerror,sync flag (works only in linux version!):
dd if=/dev/fd0 of=disk.img conv=noerror,sync
Note: "noerror" parameter skips through bad sectors after a few read-over attempts, and "sync" replaces them with NULL bytes. This should keep the remaining offsets in place and render the resulting image suitable for restoration.
3.2 dd_rescue (Linux)
This is a data recovery tool. Like dd it will dump your floppy disks, except it doesn't quit execution on read error. By default it persists until it overcomes the faulty segment or meets user decision to cancel the process. Of course, 9 times out of 10 such attempts may prove useless, but it is always worth a try:
dd_rescue /dev/fd0 disk.img
If you have no luck after roughly 5 attempts it is best to abort the job and try dd with "conv=noerror,sync" flag instead. If the damage is trivial we could fix it in 99% of instances. So, please, make no big deal out of it.
3.3 RawWrite (Windows)
Official website: http://www.chrysocome.net/rawwrite
Another open-source utility this time sporting a user-friendly interface. Unlike dd, though, it is limited to 3.5" HD (1.44Mb) disk capacity and provides no other features except dumping and writing images back to floppies.
To make an image simply click on the "Read" tab, type in the name and the path of the resulting image and click "Read" button.
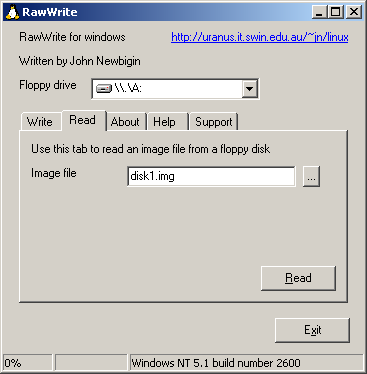
To write an image back to a floppy disk use the "Write" tab respectively, select your source image file and target floppy drive.
Note: As previously stated, this application is unable to work with media other than 3.5" HD (1,44Mb), but while it cannot dump images of unsupported format it may somehow still be able to write them back to physical media. Proceed at your own risk.
3.4 UltraISO (Windows)
Official website: https://www.ezbsystems.com/ultraiso/
A greatly evolved and versatile shareware utility. It is primarily CD/DVD oriented but is also capable of working with floppies of all formats no less effectively. For those who prefer a feature-rich and user-friendly tool this is the most recommended one as well as the most updated.
To dump a floppy disk click on the "Bootable" tab and select "Make Floppy Image...":

Specify source floppy drive letter, target filename and path:

Similarly to dd (Linux) this tool can also skip through unreadable blocks, which is one of its best assets. Simply tick "Skip bad sectors" box to enable the feature if necessary.
Attention! Only do it if your disk is positively unreadable as just a few read-over attempts may be perceived by UltraISO as a real damage which may leave certain undetected "scars" in the resulting file.
Writing an image back to a disk is the same simple, just click on "Write Floppy Image..." in the top bar, then select your image file and target drive letter.
3.5 WinImage (Windows)
Official website: http://www.winimage.com/
Another shareware utility, the most popular of all when it comes to working with floppy disks in particular. However, it is not the most convenient, perhaps even misleading a bit since a lot of people have misused it in the past which resulted in tons of incorrectly made dumps. To prevent this from happening we shall provide a step-by-step guide for the correct dumping procedure:

Click on the "Disk" tab in the top menu, select your source floppy drive and click on "Read disk".
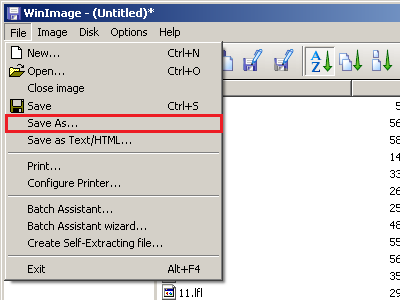
Choose the correct output format (.IMA), specify the target filename and path and click "Save".
Attention! Always use the latest version of this application.
3.6 Teledisk (DOS/Win32)
Download: Teledisk 2.23
This tool was designed to work with "oddball" formats, which "accidentally" made it suitable for dumping physically protected disks and PC Booters. It can also be used as alternative for ordinary disks with subsequent conversion to raw .IMG files.
Attention! This application doesn't click well with USB drives, you may have to use an older machine with a floppy controller and the right set of drives or purchase a Kryoflux device including the drives if you lack them altogether.
On application run you will get a menu:
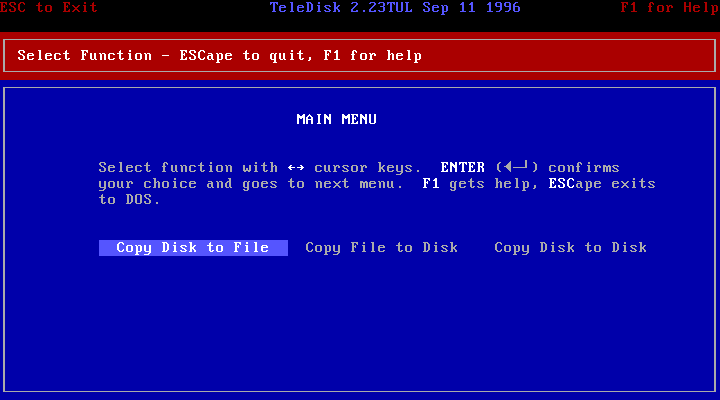
"Copy Disk To File" will dump your floppy disk into an image, the rest is pretty much self-speaking.
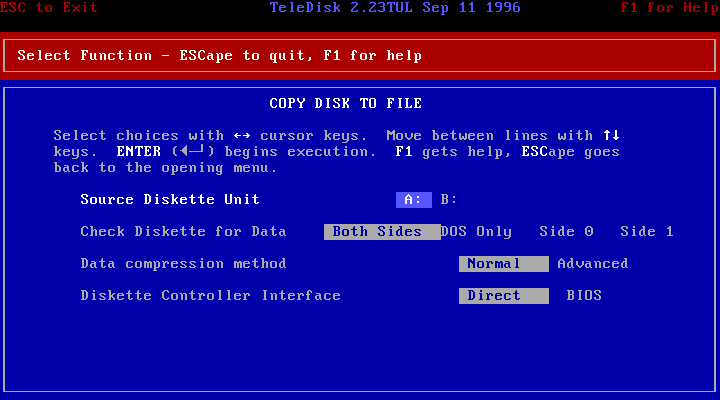
Specify your source drive letter.
Setting a side/OS limit is particularly useful in the case of PC Booters (single sided disks) or dual system floppies like PC/C64. If none of this fits isn't your situation then "Both Sides" is all you need.
The default compression setting is "Normal" and should "always" stay so. Never switch to "Advanced". If the latter is used it may cause conversion and emulation issues.
Ignore "Diskette Controller Interface". We don't know exactly what it does, but best to keep the default parameter (Direct).
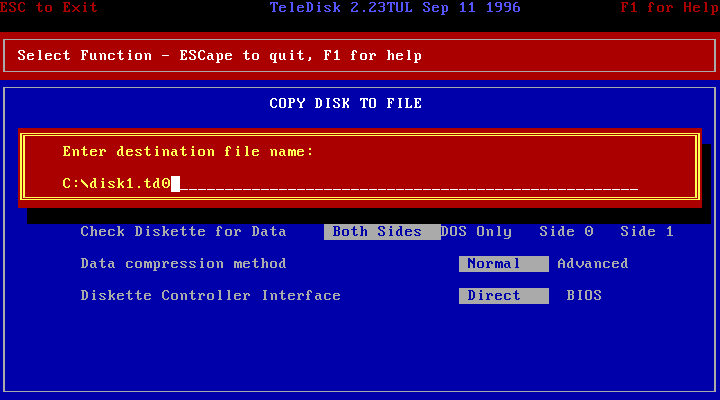
Specify the target path and filename (extension is optional).

Just press Esc here, no comments needed. This will finally initiate the dumping process. If there are any read errors - please, report.
Incidentally, if your disks are damaged you can also use Teledisk. It is designed to understand errors rather than bail out on them. It will not recover lost data, but passing through bad sectors it certainly will.
Note: Teledisk technically supports writing back to floppies, but don't expect it to successfully reproduce any protection scheme should the latter be present, it will not work. Only factory copiers or low-level controllers like Kryoflux can do it correctly.
3.7 Diskcopy (DOS/Win32)
Download: Diskcopy 0.95
This is a simple command-line utility producing raw (IMA/IMG) images. Whether you just like using older hardware or it's the only way you can harness your old floppy drives this is a good choice.
Dumping:
diskcopy a: c:\disk.img
Writing:
diskcopy c:\disk.img a:
IV. Contributing
4.1 What to upload?
Our archive is designated for PC, PCjr and Tandy floppy disk images only: DOS and PC Booter type. We accept all files of the said kind so long as they are not counterfeit and dumped correctly.
Dumps from modified or damaged floppies are equally welcome, as there is always a chance we could restore a good deal of them back to their would-be original state or use them partially to verify already existing images.
We may reject some of incorrectly made dumps, which are often self-made (fake) or dumped from disks other than original. Such are mostly useless unless they contain very rare files.
Please note, that the correct dumping procedure involves preserving file contents along with original boot sector, root directory, unused sectors etc., whereas manually injecting files into a new image or dumping an earlier made physical disk copy (which is no different unless it was cloned using proper tools) will NOT do it.
4.2 Image types
There are essentially three types of floppy disk images: raw, hybrid and stream. Raw is the default preservation format for your regular types of media. Hybrid is a non-reproducible fallback option for booters and physically protected media as well as a trade-off between precision and emulator compatibility. Stream is the most preferred and subsequent all-in-one solution, which, though requires some investment.
a. Raw (.IMA, .IMG, ,IMZ, .DSK, .FLP, .VFD)
Raw or sector-type image is an exact 1x1 disk copy dumped into a single file as a seamless stream of binary code using no compression or application-specific encoding. Unless modified or corrupt its size should always amount to source disk capacity. This format is required among other reasons for verification purposes despite the lack of support for disk-based copy protection.
With exclusion of .IMZ these files are all equal in nature and can be safely regarded as one and the same. In fact, these are NOT different formats but merely different extensions being the policies of certain few applications behind their production.
Attention! .DSK extension may also apply to Apple II, MSX or Amstrad CPC disk image type.
.IMZ is really a zipped .IMA file and a property of WinImage. It must be extracted prior to any operation as being compressed it cannot be used for verification nor is it compatible with any other software except WinImage itself. However, since this file type does not suggest a unique method per se nor uses native WinImage compression, it is therefore treated as another raw equivalent.
By default we expect only .IMA and .IMG files, which are the most generic extensions readily apprehended by the majority of emulators. These can be produced by default with applications like dd, RawWrite, UltraISO and WinImage. Other raw or otherwise IMA/IMG equivalents (except for .IMZ) require no modification other than a simple change of extension to either .IMA or .IMG.
b. Hybrid (.86F, .ANA, .CP2, .IMD, .PDI, .PSI, ,TD0)
Otherwise known as advanced sector-type images these typically come as a blend of compressed raw data and non-data sector blocks which your generic raw tool is unable to process. All except .86F and .PSI can be produced directly by their native software tools without additional hardware while the other two can only be derived from stream/flux dumps using converters.
Hybrid imaging tools and converters use exotic algorithms allowing for smarter media/dump analysis and production of re-encodes with all kinds of "deviant" patterns such as disk-based protection. Each one of the above uses its own algorithm and supports a varying range of protection methods.
The best format produced by software-alone means is .TD0 (Teledisk) as it seems to have a more or less complete understanding of bad and overlapping sectors and requires no additional hardware. This alone should suffice on most occasions as the majority of games use the said types of protection.
Warning! Teledisk will not function correctly with USB drives nor run under 64-bit system. To benefit from this utility you will have to use an older machine with a floppy controller and standard floppy drive(s).
.PSI and.86F are still more potent as they also appear to handle weak/strong/fuzzy bits and laser holes quite intelligently. However, both can only be produced via conversion from stream dumps such as .RAW (KryoFlux) or .SCP (Supercard Pro). They were conceived mainly as mountable workarounds for PCE and 86box emulators since adding direct support for stream images is apparently a non-trivial task.
Other formats are not as much desired and are somewhat deprecated. The reason being, we have little to no information about them except they are all in some way inferior to .TD0, .86F and .PSI. We may still accept them if no alternatives are possible but we cannot provide guidelines for creating those nor guarantee successful conversion or quality verification.
c. Stream (.RAW, .SCP, .TC)
Stream or otherwise flux images are produced via low-level means using advanced software & hardware combinations. When it comes to disk-based copy protection this is the most powerful method and is decidedly superior to raw or hybrid-type imaging. The best known tools of this kind are KryoFlux, Supercard Pro and Copy II PC Deluxe Option Board.
Each one of these requires an intermediary USB device (Kryoflux & Supercard Pro) or an option board (Copy II PC) which will force your floppy drive(s) to snatch raw magnetic patterns from a disk and encode them into files as opposed to reading data on pure DOS terms. Meaning, you do not only dump the exact inventory of your disk, but also your disk's physical/magnetic properties thus producing an accurate digital replica.
Furthermore, during the dump process the related application will analyze the received stream data and indicate whether your disks are perfectly intact, modified, damaged or copy protected. Although, it is not always 100% accurate it is still better than no input at all.
If you plan on purchasing a device like that we strongly recommend KryoFlux as it is quite popular and actively supported. Supercard Pro is another good choice, but less common, however. Copy II PC Deluxe Option Board is extremely obsolete, poorly documented and can only be used with much older (XT-AT) machines. We generally advise against using it unless you know better what's good for you.
4.3 Uploading
Step 1
First you should probably check to see if we already have the files in question. Feel free to browse our archive for any matching entries. However, make no judgment based on the titles, language, disk format and count alone, because there can be different versions and releases as well as modified, corrupt or incorrectly made dumps (check notes if any present). That being said, your files can be partially or completely different to ours. To do this correctly you will need to calculate SHA-1 hash of your dumped files and see if they match any of our sets (see part 1.2 of the floppy guide).
This is optional, but it could save you and us a little time.
Step 2
Prior to packing your files it is preferable to rename them for our convenience. We name all raw files as "diskX.img" (both filename and extension should be lowercase) where X is a disk number and .IMG is the extension we chose to supersede .IMA and other raw equivalents for uniformity sake since there is virtually no difference between them.
Example:
disk1.img
disk2.img
disk3.img
...
Attention! If you are a Kryoflux user, please, keep the default naming convention for the output i. e. "trackXX.X.raw", don't change it.
If disk count exceeds 9 it is best to use double-digit format for smart directory sorting:
disk01.img
disk02.img
disk03.img
...
Again, none of the above is really necessary, but it could potentially save us a little time.
Step 3
Pack your files using any desired compression method (RAR, ZIP, 7z, etc.). The filename should contain basic information such as the app/game title, year, language and source floppy disk format, i. e 1.44mb, 720kb, etc.
Example:
Loom (1990) [Deutsch] 5.25-360k.zip
You can also make photos of your floppy disks and include them in the archive. If you are a KryoFlux or Supercard Pro user, then you might as well consider making screens of the dumped media's resulting sector map and logs to supplement your claim as to whether the dumps are pristine or modified.
Step 4
Provide additional notes such as game version (if successfully retrieved), release, etc. If your dumps contain errors you should specify exactly which files are corrupt/couldn't be read from the source disk, etc. We would also like to know which software you used to create your dumps, and if you weren't the one who made them, you should notify us accordingly.
Step 5
Use Add Files link on the Share page to upload files. Please, use New Game link only if you intend to submit a game review in addition to files. It is not a crime otherwise, but it might cause us a small degree of inconvenience.
4.4 Feedback
It can normally take us up to 24 hours to process and publish files. However, under the circumstances and depending on our load it may sometimes extend to a few more days. To track our progress, ask related questions or provide additional information visit this thread.
V. FAQ
Q: Where are the download links?!
A: Sorry, floppy images are not downloadable.
Q: I see a lot of games but few applications. Are the latter really accepted?
A: Yes, just that they received lower priority at the beginning and have been largely ignored ever since.
Q: What about CDs and other systems such as Amiga, Atari and Commodore 64?
A: At this point our archive is designated for PC floppy disk images alone. Maybe the future will change it, but presently we have no such plans.
Q: What is a disk image/dump?
A: In a nutshell, it is entire contents of a floppy disk (or CD/DVD/HDD for that matter) saved into a single or sometimes multiple files depending on the chosen format.
Q: How is this different from archiving files as .ZIP, .RAR, etc?
A: A disk image (or disk dump) will preserve not just the visible data, but also format, boot record, FAT tables, root directory, unused sectors and various factory-defined properties including things like copy protection if any present. Ordinary archive will not. Furthermore, an image file can be mounted in a virtual drive of some emulator and act as a real physical medium.
Q: Why are there so many different formats?
A: They provide different encoding options where you may have to choose between compatibility, precision and physical reproducibility. See 4.2 Image types.
Q: What's the general difference between raw, hybrid and stream/flux dumps?
A: Raw is just a direct copy of your disk contents merged together except it can't store things like copy protection. Hybrid can store that and much more including a variety of protection schemes but at the cost of limited emulator support. Stream can do both quality dumping and restoration to physical disks but require additional hardware and lack any emulation support whatsoever.
Q: How do I dump my disks?
A: You will be needing the right backup tool matching your OS(s), hardware and type of source media. It is always best to use advanced tools like Kryoflux or Supercard Pro suites, but their hardware components must be purchased online. See
III. Imaging.
Q: How do I dump on Windows?
A: You can use UltraISO or WinImage for regular floppies and Teledisk for booters and protected disks (will work in 32-bit OS and regular drives only, NOT USB!).
Q: How do I dump on Linux?
A: You can use dd for raw imaging and if your disks are protected you could try running Teledisk from Wine, VirtualBox or PCem. This is not tested but technically feasible.
Q: How do I dump in DOS?
A: You can use Diskcopy or Teledisk depending on whether you want to dump booter/protected or damaged floppies.
Q: How do I know if my disks are protected physically?
A: As a rule, a product using this type of protection will fail to run if its native medium or otherwise 'KEY DISK' was not found in the floppy drive. Also, most booters use disk-based protection by default.
Q: So, if Teledisk can dump protected disks, why would anyone want to use Kryoflux or Supercard Pro?
A: 1) Teledisk is not good with every protection method, 2) It will not effectively write any protected image back to a physical medium and is therefore only good for emulation purposes, 3) You can only use it on older PCs with native floppy controllers and standard drives.
Q: Which is better, Kryoflux or Supercard Pro?
A: In all honesty, we have no clear answer to that question. They are both roughly on the same level and perform equally well or so they say. It is evident, however, that Kryoflux has grown a much bigger community, and in that respect is considerably more popular. You can take this as a recommendation.
Q: What about Copy II PC Deluxe Option Board?
A: We don't really know much about it except it's very obsolete and is only compatible with older PC families (XT-AT). We accept dumps made with that but we generally discourage the use of it, because at present time we can neither verify them as is nor properly convert.
Q: Does Teledisk work with 3.5" USB floppy drive?
A: No, there have been repeated issues on such attempts. You will have to use an older machine with standard floppy drive(s) or purchase a stream device like Kryoflux and standard 3.5" and/or 5.25" floppy drive(s).
Q: How do I dump damaged disks?
A: You can use dd on Linux, UltraISO on Windows or Teledisk in DOS.
Q: I can't seem to access this floppy, is it dead?
A: Not necessarily, it could be a booter-type disk, which generally cannot be accessed from DOS. If it's a very early 80's game then it probably holds true. To make sure you could run it through Mobygames search and see if this game was ever released as a 'PC Booter' or just try booting from it if possible.
Q: What are .86F and .PSI files?
A: They are dedicated 86box and PCE hybrid formats. Just like .TD0 (Teledisk) they are emulation-alone subsitutes for stream images except they are much more accurate than .TD0 and should be used instead whenever possible.
Q: Are images from modified or damaged disks acceptable?
A: Yes, as long as they are dumped correctly.
Q: How do I know if my images are different to or the same as yours?
A: You will have to hash your files using SHA-1 method and compare the resulting values with the ones you see in our archive. See 1.2 Comparison.
Q: Which emulator is the optimal choice?
A: It really depends on your goals and likes. If you don't plan on working with hybrid images then you could choose between DOSBox and PCem, otherwise PCE or 86box.
Q: The game doesn't start or hangs halfway through the intro. Is it a bad image or a bug in the emulator?
A: More often than not it's the wrong CPU setting. Some games can be very specific about the architecture, typically very early ones like booters with CGA graphics. Make sure to run your emulator in 8086/8088 mode first.
Q: How do I mount Kryoflux (.RAW) or Supercard Pro (.SCP) images?
A: You can't. At present time there is not a single emulator that can do it due to the rather complicated nature of stream images. Use .PSI or .86F files whenever available in respective emulators, plenty of times they are direct inheritors of stream dumps.
Note: These guidelines may change in the course of time.